

What Tipping / Gallery Rail do I need:
First determine how you intend to mount it to the surface it will be used on.
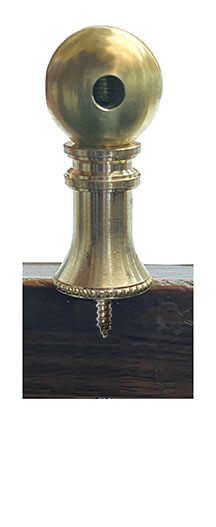
Cabinet Rail Posts, Retro Posts & Mid Century Posts
This is a fairly simple method of attachment uses wood screws. Wood screws are used to attach post to wood surface. Mount by threading wood screw down through countersunk holes in brass base into predrilled holes in wood.
To install Posts with wood screws:
- Mark location of screw-holes on wood surface.
- Drill pilot holes at marked locations. We suggest threading a steel screw into hole and then back it out. This helps thread the holes as brass screws are some what soft.
- Screw posts in place
Installation varies Depending upon Post Type
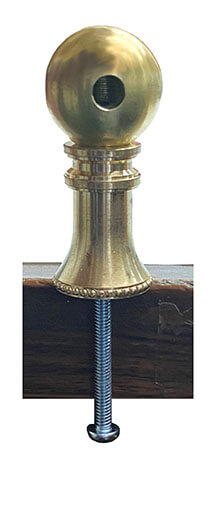
Machine-Screw Attachment Method
Best and easiest attachment method for this style post. Machine screw inserts through hole from underneath mounting surface and screws into bottom of post. Nickel-colored machine screws included. Machine screw is slotted for both a flat-tipped or Philips screw driver.
To install Posts with machine screw:
- Drill hole through wood surface, insert screws from underneath of surface, through hole and thread into bottom of post.
- The gallery rail can be used on stone such as marble or granite provided holes are predrilled at post locations. Machine screws are inserted from under-side of stone, through hole and into base of post.
- If preferred: Brass Ball Head Screws or Brass Thumb Screws can be used, in place of standard machine screws, to attach posts. Use when screw head is visible. Sold separately.
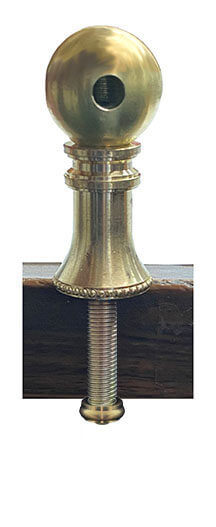
Brass Cap-Nut Attachment Method
This installation method provides an old-time appearance, as it displays a Brass Nut on underside of shelf. Use Threaded stem with brass cap nut in place of standard machine screw attachment method. It is sold separately.
Adapter-Screw Attachment Method:
This installation method is difficult, requiring extra manipulation of rod and post head when inserting rod. Top mounting will not work if using with wall mount posts. If mounting from top we recommend using Cabinet Railing Posts, as these mount from the top to provide an easier application.
Qualifications:
- Screw projects 3/8" from bottom of post. It screws down into top of wood surface.
- This attachment method cannot be used in conjunction with wall mount posts.
- Also, it cannot be used on stone surfaces.
To install Posts with rod using adapter wood screw:
1. Screw all posts into wood surface.
2. Insert rods which fit easily.
3. Tight fitting rods require extra attention:
- Cut rod slightly short.
- Slide rod into post. As rod is slightly short, additional clearance is achieved when sliding rod into post. This added clearance provides space to insert rod into last post.
- If necessary: ball-top of post can be slightly turned and rod can be gingerly bent to fit into post.
- After choosing which style to use, then plan your layout design.
- A good sketch of how you want the brass railing to appear is helpful in determining design.
Post Placement:
- Typically posts are equally spaced across front or back. This can be modified if there is something above or below the railing that the posts should be lined up with.
- Position of posts is somewhat subjective. Typical spacing between posts across front, depends upon which post style is used. The taller the post, the more distance between them. See specific layout guidelines for the railing you are using.
- If brass rail will be straight, without sides, use end posts or wall mount posts on each end.
- If brass rail will have sides, use corner posts and end or wall mount posts. (spacing from corner to end post is dependent upon the depth of what the railing is being used on).
Calculating number of post needed:
- Divide finished railing length, by what you estimate the distance between posts to be. Then subtract 1. This figure equals the total number of center posts needed.
- If total number of center-posts is a fraction, then distance between posts will need to be adjusted until you come up with an set number of posts.
- Add 2 end posts, wall mount posts or corner posts depending on layout.
- If adding sides corner posts and wall or end posts will also be needed.
Brass Rod
- Brass Rod is available in 2 lengths: 36” and 72”
- If rod is not long enough, join two rods together within a post.
- If needed, brass rod is easily cut shorter with a hacksaw.
- To calculate length of rod needed: measure length of each straight run:
If your design is a straight rail, with no sides, it is one run. However if it has multiple sides, such as an open 3 sided shelf, it will have 3 runs. - Calculate number of rods needed once you know the length of each run. Rods are available in 3' and 6' lengths. Consider that you may have leftover rod from one run to satisfy another run.
Additional Expert Tip Pages

