
About Wood Table Slides
Keep table slides in a dry area, before and during installation, as excess humidity can affect the slides, particularly before they are installed.
Size Guidelines
- Closed length of slide should ideally be at least a few inches more than half the length of table top.
- Leaf Openings are based on 12" wide leaves plus 2 inches. The extra inches allow for easy placement of leaves. Example: 26" leaf opening accommodates 2 - 12" leaves.
Make sure you have the correct-type of table slides
- 4 leg tables, dividing base and dividing leg tables where both top and legs move jointly, use standard table slides. (camber, curved arc, compensates sagging in center of table)
- Solid pedestal and non-dividing base tables, where only the top extends and the base remains stationary, use equalizer gear table slides. (camber, curved arc, compensates sagging of table ends)
- Using the wrong type of slide will accentuate the sagging of the table instead of compensating for it.
Install Table Extension Slides
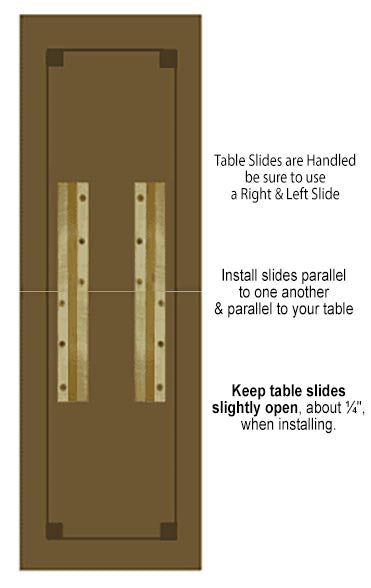
Table Slides are handed: use a right and a left hand slide when installing.
- Install a right-slide (marked with a blue bird symbol) and a left-slide (marked with a red bird symbol).
The blue or red designations are placed opposite to each other. It doesn’t matter which way are pointing. These designations are just to indicate that you have 1 red and 1 blue per table. - If slides are not marked, check to make sure you have a left and right slide.
- Using a pair of slides, benefits the overall efficiency of extending tables. When one slide is weakened by an outward movement, the opposite slide counter acts by pressing one section against the other, stabilizing the movement and giving the result of a smooth and efficient sliding (opening).
- In addition: using a pair, minimizes the wobbling movement of a table, when the pulling action is triggered.
Attachment Screws
- Use #10 round headed screws
- Screw length: 1-1/2" length is suitable for many tables however check length. Care must be taken so that thread portion of screw, protruding through table slide, does not go thru table top.
- Do not strip the screw.
- Carefully drill pilot holes, in the table top, with a depth stop collar to prevent drilling through table top.
Installing Table Slides
Table Slides are handed: use a right and a left hand slide when installing.
- Install a right-slide (marked with a blue bird symbol) and a left-slide (marked with a red bird symbol).
The blue or red designations are placed opposite to each other. It doesn’t matter which way are pointing. These designations are just to indicate that you have 1 red and 1 blue per table. - If slides are not marked, check to make sure you have a left and right slide.
- Using a pair of slides, benefits the overall efficiency of extending tables. When one slide is weakened by an outward movement, the opposite slide counter acts by pressing one section against the other, stabilizing the movement and giving the result of a smooth and efficient sliding (opening).
- In addition: using a pair, minimizes the wobbling movement of a table, when the pulling action is triggered.
Attachment Screws
- Use #10 round headed screws
- Screw length: 1-1/2" length is suitable for many tables however check length. Care must be taken so that thread portion of screw, protruding through table slide, does not go thru table top.
- Do not strip the screw.
- Carefully drill pilot holes, in the table top, with a depth stop collar to prevent drilling through table top.
When Installing
- Slightly squeeze the parts together to eliminate looseness. The play between the sliding components of the slide prevents the slide from "sticking" when it absorbs a little humidity. Slightly squeezing the parts together at installation eliminates the looseness, but space remains to absorb the natural humidity variances in a home.
- To install the slide, close the table but keep the slide slightly open (about ¼"). This will insure that your table always completely closes before the slide does.
- Install your slides parallel to one another and parallel to your table. A non-parallel installation of the slide will prevent them from opening adequately.
- Both types of Table Slides screw directly to underside of table.
- For dividing base tables where top moves with legs:
Place table top upside down. Layout slides. Screw slides to underside of table top. Be sure slides are slightly open, about ¼", when attaching.
If using with a center leg: Pre-drill the holes in the center section of the slide before you fix it to your center leg. Make sure the holes do not pierce the dovetail part of the section as the screws would get in the way of the opening. - For solid pedestal and non-dividing base tables - equalizing slides:
Working with the top upside down. Determine correct placement of slides. Then attach slides to table top Being sure slides are slightly open, about ¼", when screwing to top. At this point, check to be sure action is smooth and not binding. Pedestal can then be attached. Top of pedestal typically has a board attached to it which is screwed to slides. Center pedestal over slides. Screw the board to the center rail of both left and right slides. Be sure screws do not get in way of the equalizer gear mechanism.
These are manufacturer guidelines only, individual applications may vary
Additional Expert Tip Pages

